Saturday, July 6, 2013

CHRYSALIS 4th DAY SHOES

These are shoes I made for the caterpillar I sponsored for 4th day Agape. If you don't know what I'm talking about you DEFINETLY need to find out ;)

FEEL FREE TO COPY ME

Sorry I can't provide much instruction. This project involves some drawing skill and imagination.

YOU WILL NEED:
  • cheap white shoes (got Keds from Walmart)
  • various colors of sharpies or other permanent marker
DO NOT GET THESE SHOES WET OR YOU WILL HAVE A HOT MESS!

Monarch butterfly.

2 Corinthians 5:17 and the caterpillar.

Flight #33 and "Fly With Christ" and a tiny butterfly.

"De Colores"


FLY WITH CHRIST EMMAUS COMMUNITY!

Saturday, June 29, 2013

4th of July Shorts! QUICK AND EASY!

I know it's been A VERY LONG TIME since I've uploaded a project, but I just made these super easy and CHEAP shorts and thought I would share them with you!

I was babysitting an 11 year old girl and we went into Justice (aka Limited Too for all you 90s and 2000s kids) and saw these adorable shorts. I just HAD to have them in my size!
 
Here are the ones from Justice...
 
So, here's what you need (if you don't know what something is, you can check out the how-to pics):
  • Fabric paint: red, white, and blue
  • Little paint brushes
  • Cheap pair of shorts (got mine from Plato's Closet for $6... if you mess up your shorts you don't want to mess up on a $50 pair of shorts)
  • Plate to put the paint on
SORRY FOR THE TINY PICS.. IF I MAKE THEM ANY BIGGER THE QUALITY WILL BE BAD...
 
Step One:
Paint a blue rectangle where the right corner slightly
overlaps the pocket (see original for reference).
Apply white (I found out later that the red really
stands out on the white so if you want you can do
the entire stripe section white first.
Also, if you notice in the original the flag isn't a perfect
rectangle, but you can do it how ever you want.
 
Step Two:

Apply stars to blue. Mine are just dots...
I'm not crafty enough to make tiny stars.
 
Step Three:
 
Wait for blue and white to dry. IMMEDIATELY WASH PLATE IF IT'S A GOOD PLATE!!
 
 
Step Four:
 
APPLY RED!

This was my original, but then I
realized it didn't look like the picture.

SO I FIXED IT.
I tried splatter paint with the white and red, but it got very dangerous for my table, so if you want the vintage splatter paint look then splat your brush randomly on the flag (white on the stripes and red on the blue.... I actually don't like the red on the blue, but too late for me now.. haha).
 
HOPE YOU ENJOY YOUR 4TH OF JULY!


Thursday, July 19, 2012

Under Constuction: American Flag Tank Top

HAVING SOME TECHNICAL DIFFICULTIES, BUT FEEL FREE TO DO WHAT YOU CAN WITH THE TUTORIAL. IT HAS ALL THE INFO, JUST NOT ALL THE PICS.


Sadly I have been putting off typing up such an easy DIY for this just because I am lazy.

This awesome how-to came to me from Gabbie VanHook!!

Anything written in red is an edit from me or a suggestion.

What you'll need: (I got everything from Hobby Lobby)

  • plain white t-shirt
  • duct tape (masking tape works also)
  • scissors
  • straight pins
  • plastic bag
  • pizza box or other type of cardboard
  • spray paint (blue and red; I made three shirts with just one can of each, so one can should be good)
  • adhesive stars* (if you can't find adhesive stars, or any stars, just make a pattern for a star out of cardstock and trace enough for your shirt)
    • * I got my adhesive stars from the kids' craft section of HL where all the puffy adhesive letters are. There are assorted sizes & colors. I used only the big stars from each package (15). I made 2 shirts and the large one required all 15.
Step 1:
  • Lay the shirt out flat and cut strips of duct tape out one by one.
  • To get the same width in between strips, I spaced out the strips the same width as the duct tape. Make sure your strips wrap around to the back of the shirt, maybe about an inch overlap. 
  • Then tape off the area of the blue section with one straight strip directly in the middle of the t-shirt. Instead of using a bunch of duct tape, I taped a plastic bag - with no holes - over the said section.
  • Then make sure all the edges are firmly pressed down so the paint doesn't bleed through.
 Step 2:
  • Put a cardboard box in the shirt to separate the front and back so the paint doesn't bleed through to the back and stick together. I used a pizza box. (the pizza box is also very helpful to hold the straight pins in place later)
  • Spray lightly and don't get too close or trigger happy because the paint will bleed through! It happened on mine, but not my bf's (the second shirt I made).
  • Make sure you've distributed an even coat and let it dry for about 10-15mins...enough time to where the paint on the tape is dry, allowing you to handle the shirt without it marking up the white space. (I did mine in the heat and left the shirts in an area dirrectly in the sun, so they only took 5 mins to dry.)
Step 3:
  • Pull off the tape and now tape off the section to allow you to work on the blue area. (Protect your red area with a plastic bag.)
  • Lay down the stars in the general area you'd like them to be so you can get a good idea on what it will look like. I overlapped mine on to the duct tape because I liked the look it has.
  • Next, peel the adhesive backing from the stars and place them down. IMPORTANT: Use the pins to pin down the corners of the stars so that the paint does not get under the star making it look sloppy. If you have enough pins, go back and pin down the inner edges too. (I had enough to do this on mine, a size small) (If your stars don't have adhesive, be sure to spray them from directly above.)
 
Step 4:
  • Spray in the same fashion the entire blue section and wait another 10-15 mins. Pull up the pins and peel the stars off the shirt.
Step 5:
  • Once the shirt is completely dry and manageable, turn it inside out and place a tank top over it and trace the tank on the shirt. (Turn the tank inside out too so you don't get marker on either of the see-able sides of the shirts) You don't have to use a tank, you can eye-ball it, but I love the tank that I used and the way it fits, so I traced it. (Try not to use your favorite tank top; the sharpie will not come off. If you must, try using a pen.)
Step 6:
  • Cut along the lines you traced/drew. Be aware though! If you traced a tank, the neck line may be different in the front and back so be careful. (Make sure your lines touch on the arms and shoulders in the front to the arms and shoulders in the back.)
  • Turn it right side in, and voila!
  • Now, I did "mess" mine up (I got trigger happy with the spray paint and it bled a lot) and "fixed" it by making the back real cute. The edges of the red stripes looked really bad, so I taped off the front and used the pizza box again, and gave it a cool effect and then cut it up and now I LOVE it! (I, however, did NOT use this last technique on my bf's shirt! haha)  OH! and I cut the hem off the bottom of the shirt to give it less of a store-bough tee feel. And once you're all done, it's washer/dryer-safe.


If you want your shirt to look like this: 


  • Fold the shirt in half and line off a triangle shape section at the fold (with tape, etc) making the bigger end of the triangle and the tape near the shoulders.
  • Cut strips about pinky width all the way to the bottom of the triangle. Open the shirt and pull each strip from one side across to the other causing the strands to curl and become longer.
  • Next, take the second strings and pull it up and under the first string, and then back down. Now take the third string and do the same to the second and repeat. When you get to the bottom, repeat the whole process a few times depending on how narrow the bottom is and how difficult it becomes to 'braid.'
  • When you are satisfied with how it looks, (I only did it twice) take the last strand and cut it in half and tie it of to the strip previous. (My last strand was too small so I just used white thread and sewed it down to the shirt.)
  • Note: I spray painted the back of the shirt before I cut it and once the 'braid' was finished. (I did the braid first and then covered up the braid with a bag when spraying the shirt. It just depends on how you want it to look.)
QUESTIONS? Here is Gabbie's email: gabtastic12@gmail.com

Will be adding Gabbie's finished product photos when my email decides to come back up... in 1-24 hours.

Below are some variations that me and my friend did:


Thursday, June 28, 2012

Posting this for a scholarship...

The World Has One Giant Hangover

          I am ashamed to say that society has been heavily influenced by the 2009 blockbuster, The Hangover. In this Phillips and Goldberg film, three friends throw their buddy a bachelor party in Vegas that eventually gets incredibly out of hand. The three wake-up the next morning to find the groom missing and no memory of the night before. During their “comedic adventure” to find their friend before his wedding, they get in to many situations that an earlier generation would surely find vulgar to be shown on the big screen.
          This movie portrays to ages 17 and up, and to those under 17 that have gotten their hands on the movie, that it is alright and even cool to drink, gamble, have premarital sex, steal, kidnap, do drugs, give drugs to others without their knowing, watch porn, go to strip clubs, have frivolous marriages, degrade women verbally, sexually harass children, see or distribute child pornography, have one-night stands, have or give oral sex, perform bestiality, have necrophilism, perform violence, display public nudism, self-mutilate, domestically abuse, drive carelessly, express profanity, express crude hand gestures, drive drunk, cheat, etc.
          But just a movie wasn’t enough for the producers and cast to ruin our already corrupted society. Merchandise, such as t-shirts, costumes, and bobble heads, began appearing in malls all over America. Then, in 2011, a sequel to the movie was released.
          I believe that though The Hangover is not the sole reason for the corruption of our society, I think that it is a prime example of all of the media that has helped turn our teens into sex-crazed, drug-addicted, drunkards. Many countries, including China and Indonesia, have banned American media because of the vulgarity. Society only promises to digress as another addition to the series is scheduled to be released in May of 2013.


Sunday, June 24, 2012

The CUTEST Homemade Journal You Will Ever See!!


HOW TO TURN THIS.....

....INTO THIS!!


I made this for my mother for Mother's Day, but I acutally just finished it today. My mother has God time every morning and she journals, so this was absolutely perfect for her.

I got this idea from:
http://dawnmcvey.typepad.com/these_are_a_few_of_my_fav/2011/08/gratitude-journal-day-5.html where I have seen THE CUTEST ideas for crafts/inspiration.

You will need:
  • small-length 3-ring binder
  • 3-ring whole punch
  • hot glue gun
  • modge podge
  • scissors
  • assorted glue
  • scrapbook paper
  • any other art supplies you think you may need (buttons, ribbons, etc.)
  • paper cut-outs from:
  • any glitz and glam that reflects the personality of the person the journal is for
    • examples: my mom likes to garden and she is very in to her relationship with God soo..
    • i bought assorted craft flowers
    • flower stamps
    • i chose her favorite worship song and made it the theme of the journal


Give them a space to edit themselves! :D


Seperate pages with some scrapbook paper with some meaningful sayings!


Check out my new exercise blog:
http://www.apathof10steps.blogspot.com/

Check out my awesome cousin's photojournalism blog:
http://www.storiestoldthroughalens.blogspot.com/

Thursday, May 24, 2012

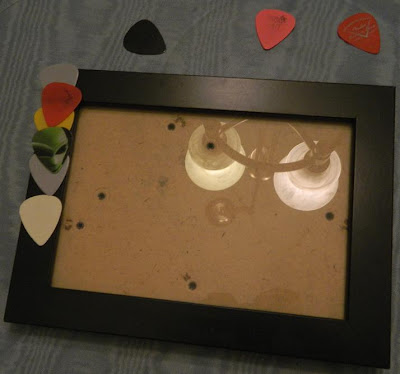
"Pick"-ture Frame

SUPER SIMPLE PROJECT

I made this frame for Father's Day. Both my dad and I play guitar, so this is a really personal gift.

If you can think of something else that could go in place of the guitar picks for Dad please leave comments!!
Some ideas that just pop into my head, but not quite sure how it would work:
  • fishing lures (wacky worms, spoons, etc.)
  • golf tees
  • logos of his fave sports teams
....see my other ideas suck....

It may be easier to think of ideas for Mom:
  • pieces of flower seed packets
  • fake flower petals
  • glitter/rhinestones (for the glam mom)

For this project, you will need:
  • a FLAT, WOODEN picture frame
    • FLAT is mandatory (complete with glass and backing)
    • wooden is suggested for ease
  • hot glue gun
    • hot glue sticks... of course
  • assorted guitar picks
    • because we are musicians we already had these at home; you can get a cheap pack of picks at any guitar store (ex. Guitar Center, Guitar and Banjo); you most likely won't find different colors in one package, but that is what the optional paint is for
  • assorted colors of paint (this is only for the guitar picks; if you have enough of a variety of colors of picks, then you will not need the paint)
    • you will also need a paint brush
  • any other decor you would like to include....ex:
    • sharpies
    • glitter
    • paint
    • rhinestones
    • feathers
    • etc.
The following is what you will need if you decide to only do half of the frame in guitar picks and half in some cute scrapbook paper (as shown in the end product):
  • scrapbook paper
    • if you just need one piece and don't want to spend money on a huge book of paper, you can buy individual pieces of scrapbook paper for 40-50 cents at Hobby Lobby 
  • scissors
  • modge podge
  • a second paint brush if you don't want to use the same one you used for the paint
  • sand paper


Step 1:
  • Begin hot gluing (in flattering layers to cover the frame) guitar picks onto the frame

  • I had a lot of grey picks, so I brought out the paint and applied a thin layer of paint on boring picks. I even got a little crazy-experiemental with some of them.

Step 2:
  • If you want to cover the entire frame in guitar pics.. continue exactly what you are doing; then set aside for a few hours to ensure that everything is dry.
  • If you would like to add paper to the bottom half, continue on to the next step.

Step 3:
  • I found the directions for modge-podging scrapbook paper to wood here:
    • Some of my tips for this specific project (or not included in her instructions)
      • before doing this, take out the glass and backing (this gives you more room to work and protects the glass from a gluey mess and sanding)
      • it actually turns out better for the edges to be too big for the frame (rather than too small)
      • sand the inside edges of the frame also
      • when you are done, modge podge over the edges you sanded to ensure that the paper will stay long-term
Step 4:                                   
  • let dry
Step 5:
  • choose the perfect picture of you and your dad and place it in the frame.


Step 6:
  • present it to Dad and watch him smile!

Thank-you's and New Stuff!

First of all, I would like to thank my 1 follower :D

Secondly, I'm going to do that thing that all bloggers tend to do while all followers/random readers roll their eyes.... appologize and make excuses:
        Appology: I am sincerely sorry for only posting one cute project and making the rest of my page about nagging at myself for not blogging.
        Excuse: But (cliche coming up... now) life just gets in the way... and I have been trying to survive my first year of college.
        Empty Promise (that I hope to keep for both you and me): Since summer is here, I hope to be posting a lot more often (haha shouldn't be too hard to post more often than the ONE TIME THAT I ACTUALLY POSTED!)

Anyways, I am currently working on four projects and have two complete projects that I need to share with y'all. I am super motivated about one that I am currently making, so I will be posting that one first..

REMEMBER:
          If the title says "UNDER CONSTRUCTION", then I haven't finished editing the blog.....

Thanks, whoever you are!
You are officially my favorite person!!

PS. COMMENTS ALWAYS WELCOME...INCLUDING YOUR EDITS OF  MY PROJECTS OR PROJECTS OF YOUR OWN YOU WOULD LIKE ME TO ADD/TRY :D

<33